Map Marker V2 legacy help center
Map Marker V2 legacy help center
If you're looking for the regular help center, click here.
If you're looking to install/use the legacy version Map Marker V2, see details here.
To get started with the help center, choose the platform you are using:
Map Marker V2 legacy help center for Android
Map Marker V2 legacy help center for iOS
Map Marker V2 legacy help center for Web
This is an archive copy of the help center for the legacy V2 version of Map Marker.If you're looking for the regular help center, click here.
If you're looking to install/use the legacy version Map Marker V2, see details here.
Main map interface
Main menu interface
Marker info window
Using markers, lines and polygons
Creating markers
Creating lines
Creating polygons
Editing markers, lines and polygons
Deleting markers, lines and polygons
Using the organizer
Using map folders
Create a folder
Edit a folder
Marker templates: custom fields
Mass assign color and custom fields
Presets, templates and bulk icons with folders
Cloud and collaborating
How to sync a local map folder on the cloud
How to create a new map folder on the cloud
How to share your map cloud folder with other people on the cloud
How to open an existing map file from the cloud?
How to restore a previous version from history?
Importing and exporting markers
How to export/share your markers?
How to import your markers from a KML, KMZ or CSV file?
Migrating your data to a new device
Advanced features
Configuring third party search sources
How to use offline maps?
How can I import my starred locations from Google Maps (locations marked with a star on Google Maps)?
How can I extract POI images from Map Marker?
Amazon Web Service S3 setup
FAQ
What is the premium upgrade?
I want to try early features, how can I use the beta?
How can I help with translations?
I have a feature idea, how should I submit the idea?
How can I stay tuned about what’s coming soon for Map Marker?
Why is Map Marker not a navigation app?
How do I add locations on Google Maps?
A place in Google Maps has wrong/inaccurate data, how do I fix it?
Troubleshooting and known problems
Cloud sync error: 404 file not found
GPS location inaccurate
Problems with Google My Maps
Premium troubleshooting
Problems with corrupted files on app launch (code 14 SQLITE_CANTOPEN)
Problems with Google Play Services
Problems with map display: blank map
Problems with blocked internet access
Collecting log files when encountering errors
User interface description
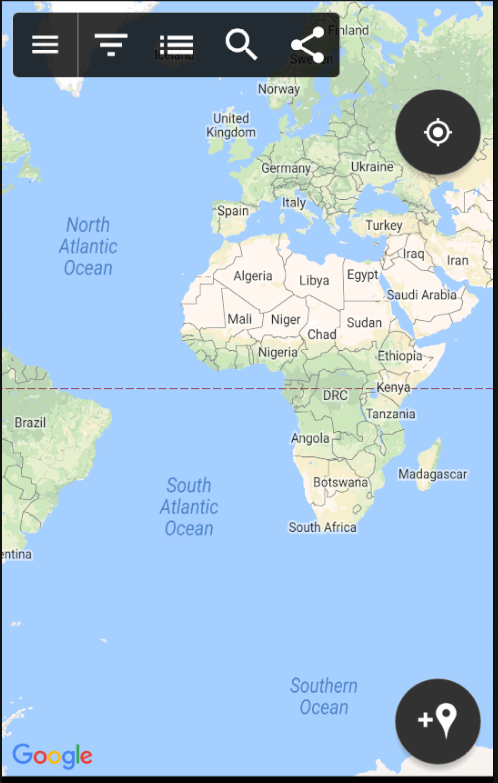
Main map interface
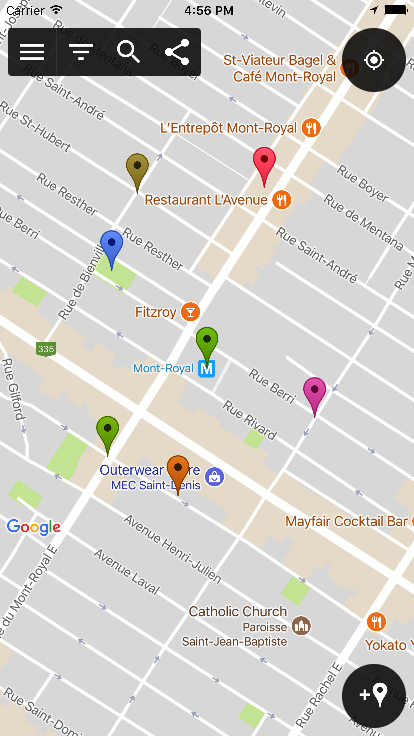
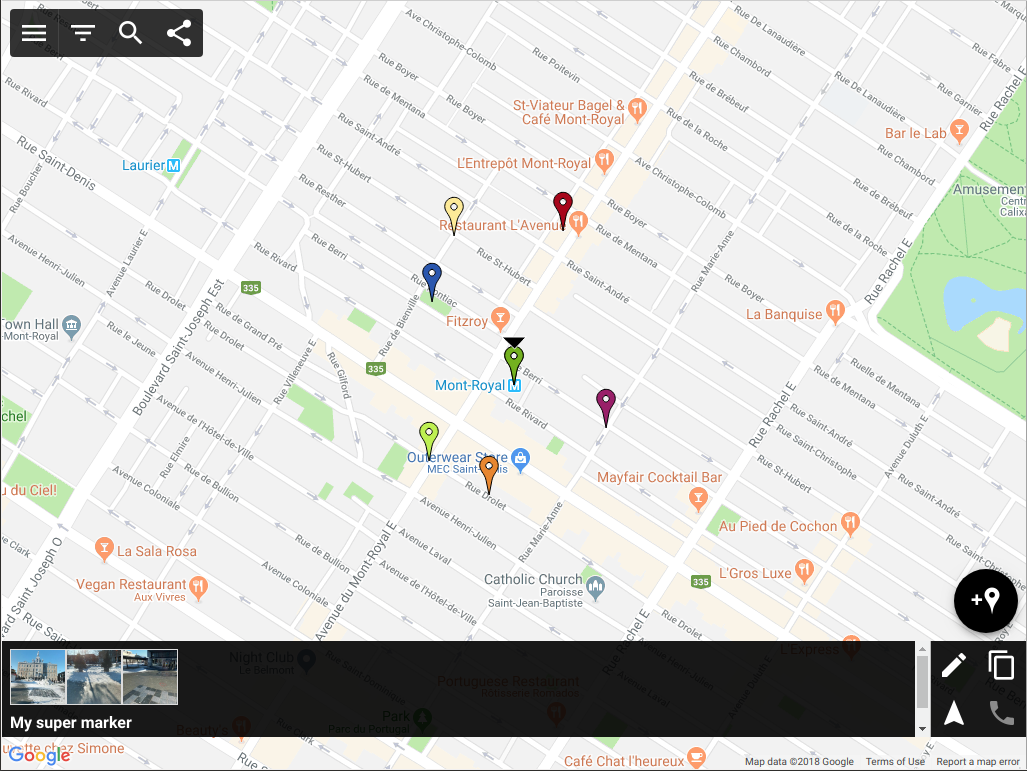
In the screenshot below, from left to right and from top to bottom, we have:
- The action bar (top left)
- menu button
- jump button
- organize button
- search button
- share button
- The “my location” button (top right)
- The add button (bottom right)
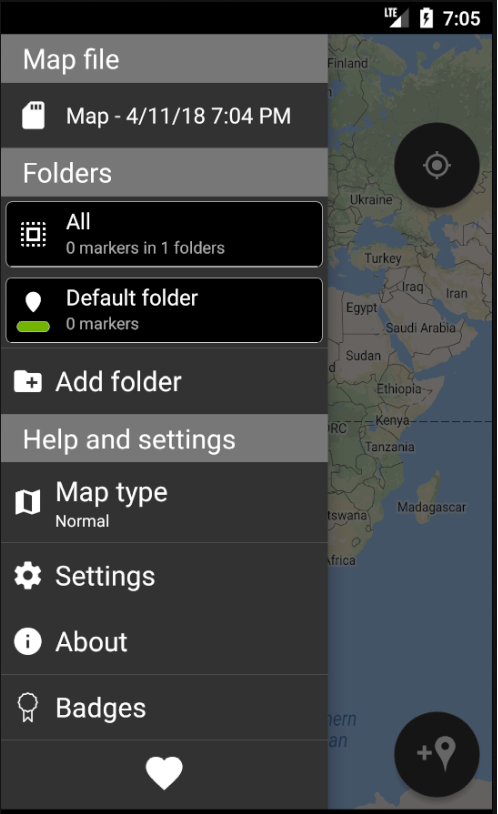
Main menu interface
Clicking the menu button will open the main menu. The main menu has the following elements (from top to bottom):
- Map file header
- Folders
- Add folder button
- Map type button
- Settings button
- About button
- Premium-related elements
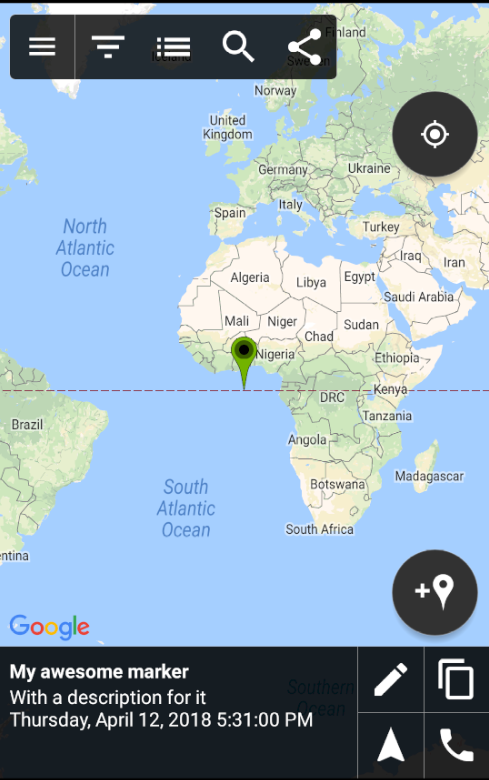
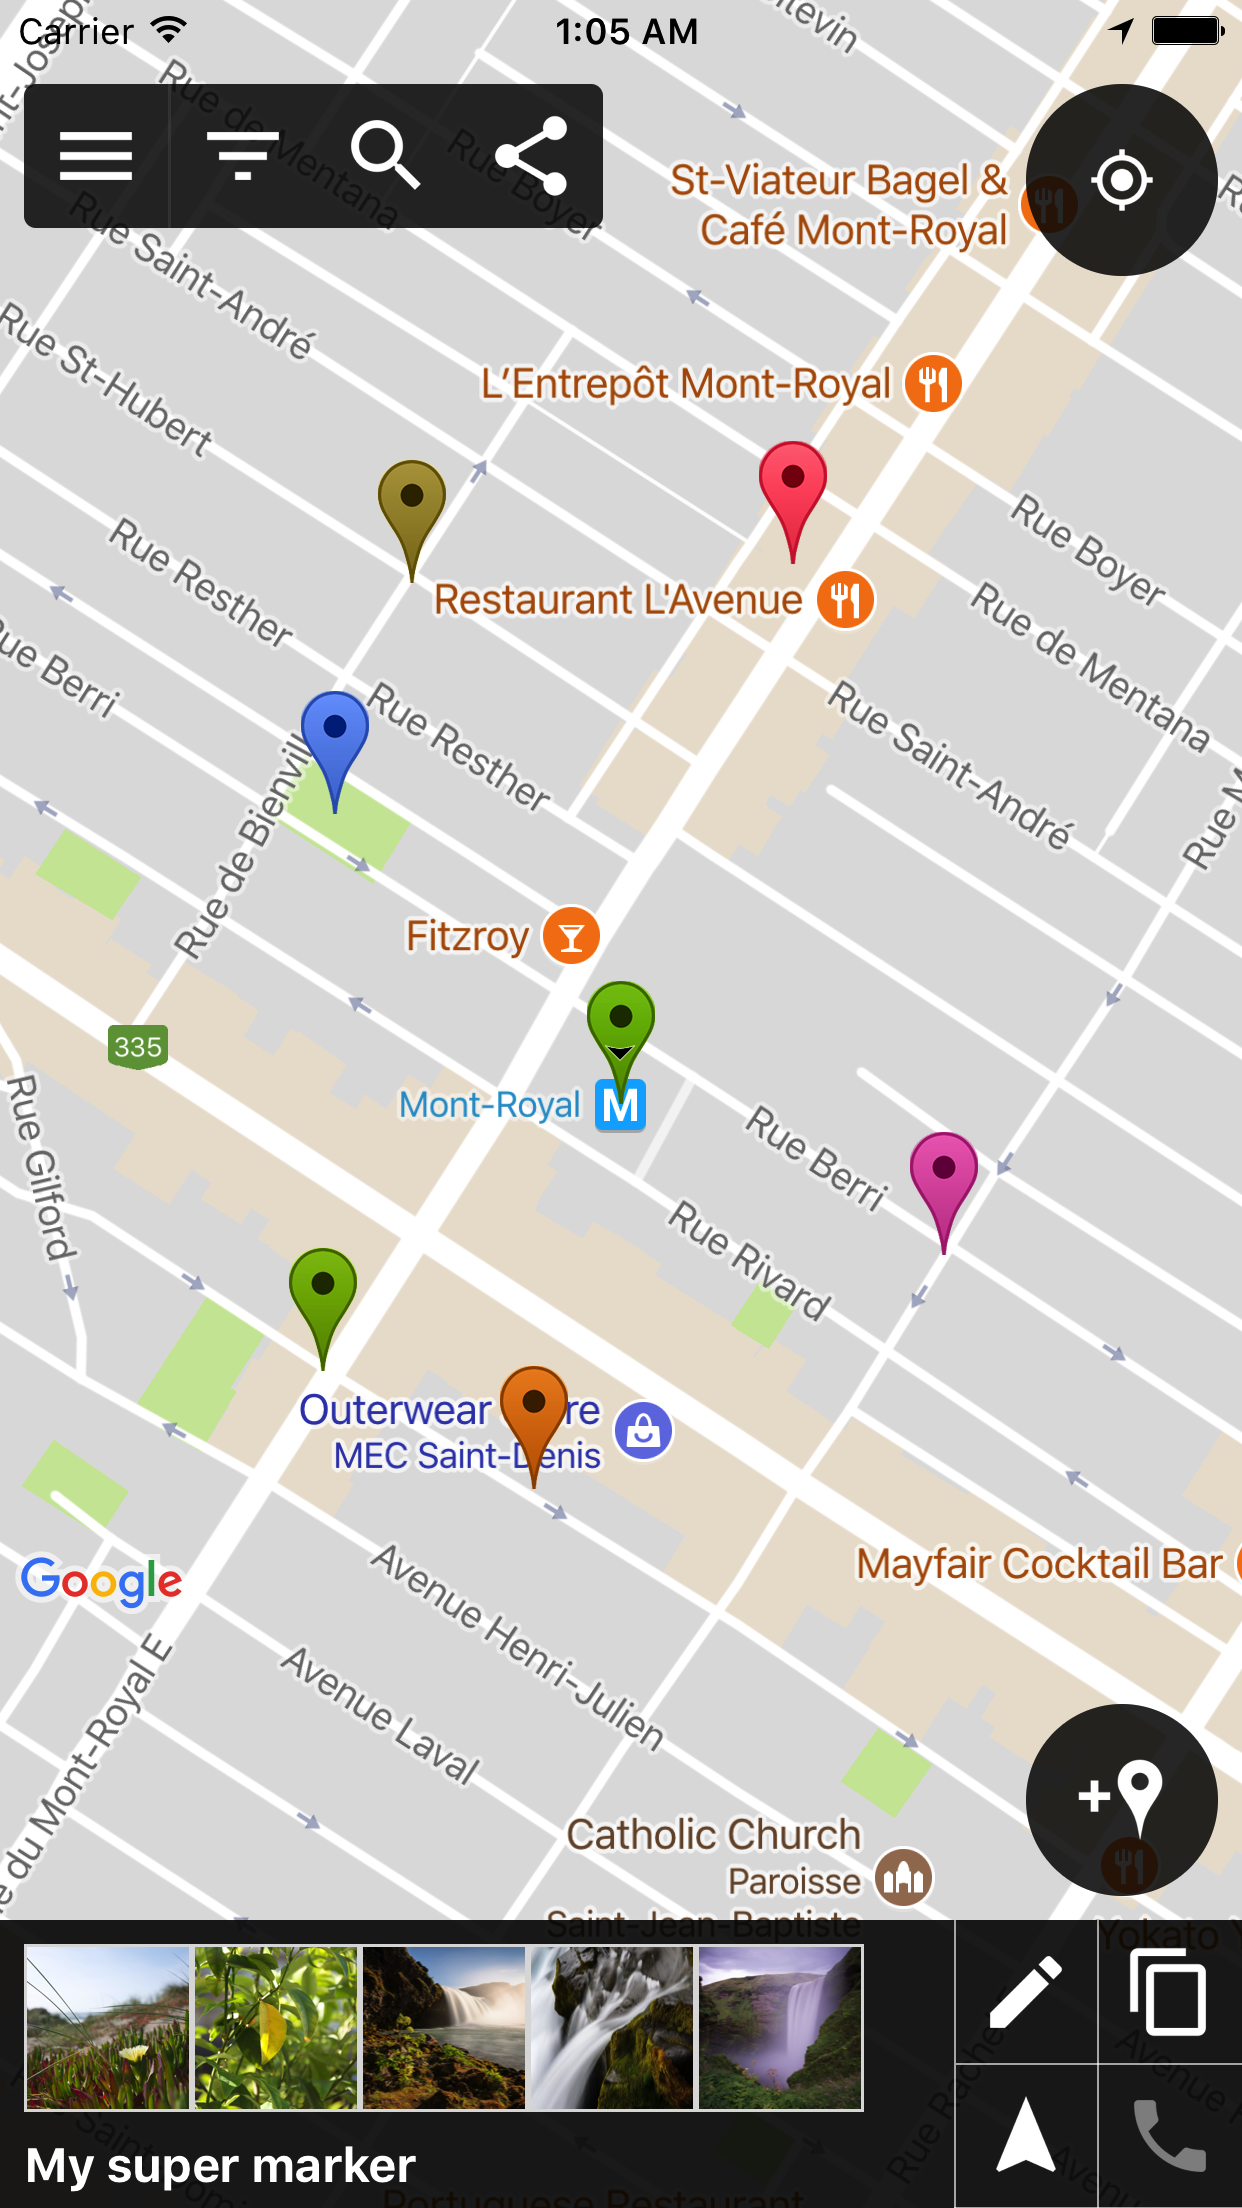
Marker info window
When you select a marker (when clicking on it for example), you will see the marker info window. The info window has 4 buttons:
- Marker edit button (top left)
- Copy to clipboard button (top right)
- Navigation button (bottom left)
- Call button (bottom right)
Using markers, lines and polygons
Creating markers
To create a new marker, click on the add button from the main map interface, then move the map around to place the target where you want to place the marker. When the target is at the desired location, click “OK” to place the marker.
Creating lines
To create a new line, click on the add button from the main map interface and then click the line button on the left. Place new points with the “+” button, move from one point to another with the arrow buttons and click the save button when you’re done.
Creating polygons
To create a new polygon, click on the add button from the main map interface and then click the polygon button on the left. Place new points with the “+” button, move from one point to another with the arrow buttons and click the save button when you’re done.
Editing markers, lines and polygons
To edit a marker, a line or a polygon, start by selecting it (by clicking on it for example) and hit the edit button of the info window showing up. This will open the marker edit page. From there you will be able to edit all the attributes of the marker. Note: if you’re editing a line or polygon, you will have the option to edit the points of the line or polygons from this page by clicking the “edit” button in the “Coordinates” section.
Deleting markers, lines and polygons
To delete one marker:
- select the marker (by clicking it for example)
- click the edit button in the info window, this will open the marker edit page
- click the 3 dots at the top to bring up the menu
- select the delete option
- confirm the deletion
To delete multiple markers at once, you can use the organizer (see the "organizer" section from this help page)
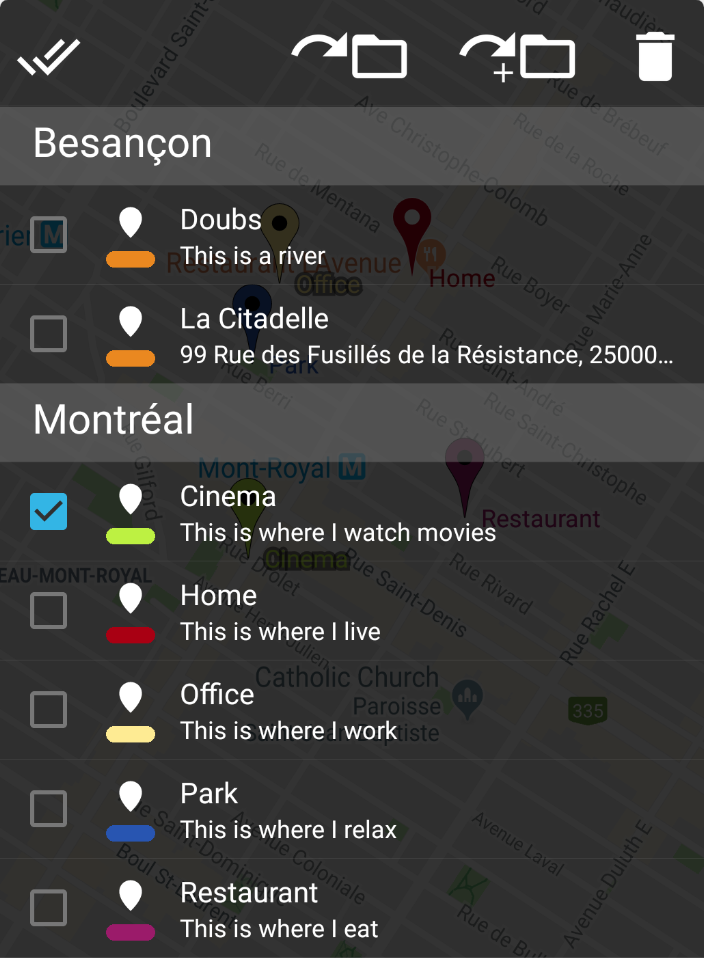
Using the organizer
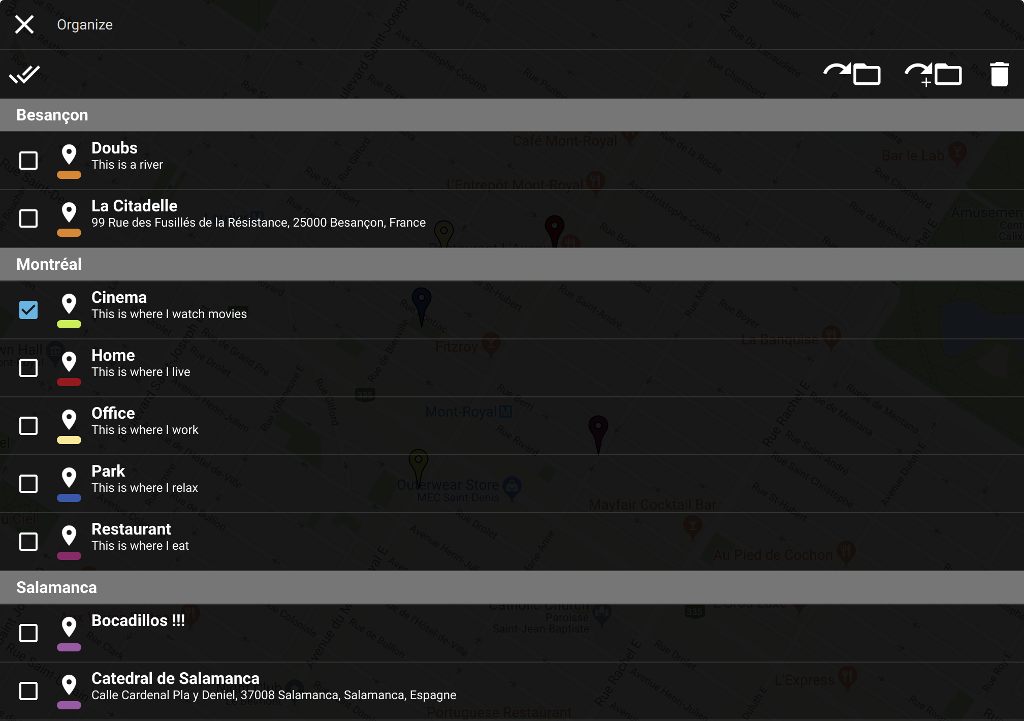
You can open the organizer by clicking the organize button from the top bar of the main page. The organizer will allow you to perform actions on multiple markers at once.
At the top of the screenshot below, we can see from left to right:
- Select all button: select all the markers in the list
- Move to folder button: move the selected markers to another folder
- Copy to folder button: move the selected markers to another folder
- Delete button: delete the selected markers
Using map folders
You can use map folders to organize your markers into different sections. Things you can do with folders:
- create a folder
- edit a folder
- marker templates: custom fields
- mass assign color
- mass assign custom fields
Create a folder
To create a folder:
- open the sidebar
- click "Add folder"
- enter the desired folder information
- click ok to save the new folder
Edit a folder
To edit a folder:
- open the sidebar
- long press on the folder you wish to edit
- modify the folder to your liking
- click ok to save the changes
Marker templates: custom fields
While creating or editing a folder, you can define custom fields into the folder. Those folder custom fields will act as a template: when creating a new marker with only one folder selected, if that folder has custom fields then the folder's custom fields will automatically be added to the newly created marker.
To create a folder's custom fields from the folder create/edit page:
- click "more options"
- select "add custom field"
- edit the custom field to your liking and save it
To edit a folder's custom fields from the folder create/edit page:
- click on the custom field from the custom fields list
- edit the custom field to your liking and save it
Mass assign color and custom fields
When changing a folder’s color or custom fields, a prompt will offer you to mass-assign the color or custom fields to the markers inside that folder.
Presets, templates and bulk icons with folders
If you want markers to be automatically created with a specific combination of icon, color and custom fields you can achieve this through folders. Folders will act as templates for their children markers. To do this:
- Create a folder
- Choose the icon, color and custom fields that you would like to see by default for new markers
- Save the folder
- Double click on the folder from the main menu to select only that folder
- And any new marker that you create will inherit its parent folder’s attributes
Cloud and collaborating
How to sync a local map folder on the cloud
If your map file is local and has not been synced on the cloud yet, follow those steps:
- Open the left drawer
- Click on the map file to open the file options menu
- Select the "cloud sync" option
- Select "Google Drive"
- Select your account
- Click ok
How to create a new map folder on the cloud
- Open the left drawer
- Click on the map file to open the file options menu
- Select the "create map file" option
- Select "create cloud map"
- Select "Google Drive"
- Select your account
- select the folder where you want the cloud folder to be saved
- Click ok
How to share your map cloud folder with other people on the cloud
- Open the left drawer
- Click on the map file to open the file options menu
- Select "share cloud map"
- Open with the Google Drive app
- Open the cloud folder details
- Select "add people" and add give "write permissions" to your friends
- Have your friends install Map Marker
- Your friends will then need to open the existing map file from the cloud
How to open an existing map file from the cloud?
- Open the left drawer
- Select the "open map file" option
- Select the "open cloud map" option
- Select "Google Drive"
- Select the cloud map you want to open
How to restore a previous version from history?
- open the left drawer
- click on the map file to open the file options menu
- select the "advanced" option
- select the "view history/restore" option
- select the version to restore from the list
Importing and exporting markers
How to export/share your markers?
- Click the "share" button of the main action bar (last button)
- Select "All markers and folders"
- Select the format of export
- Select the app to export to (Gmail, Google Drive, Dropbox, etc.)
How to import your markers from a KML, KMZ or CSV file?
- Download the file to your device
- Open the side drawer by clicking the left button of the main action bar
- Open the settings by clicking "settings"
- Scroll down and click "Import/Export"
- Select "Import"
- Select the file to import from the in-app file explorer
Note: the CSV file import will only work if the file has "Latitude" and "Longitude" columns. To see an example of how the file should look like, you can export a CSV file from Map Marker and send it to yourself.
Migrating your data to a new device
If you lost your device or did a factory reset or simply got a new device, you might need to migrate your previous markers data to this new device. Depending on your case, there are several ways to do this...
Case 1: You were using the premium cloud sync on your previous device
⇒ Simply open the existing cloud map by following the instructions in this section: How to open an existing map file from the cloud?
Case 2: You were not using the cloud sync, but you saved your markers into a file with the export feature
⇒ To import your markers into the new device, follow the instructions in this section: Importing and exporting markers
Case 3: You created no backup but you still have access to the previous device's data
⇒ You will need to export the markers data from your previous device, and then import your markers data into your new device. For more information on how to export and import data, see the following section: Importing and exporting markers
Case 4: You created no backup and you do not have access to your previous device's data
⇒ If your previous device had Android 6 or up installed, it might have backed up some app data automatically through Google Drive, depending on your settings at the time. Upon installing the app on your new device, the data might be restored automatically. If that's not the case, there is no other way to retrieve the data to my knowledge :'(
Advanced features
Configuring third party search sources
You can add or configure third party search sources in Map Marker from the "Places search sources" section menu.
Once you have obtained a third party search source configuration, you can re-use this same configuration on any device running Map Marker.
To use a configuration, from the search source menu in Map Marker:
- Click "Add or configure search source"
- Click on the search source that you want to add/configure
- Enter/paste the requested configuration values
- Check the displayed result (success/failure)
Below are the different third party sources that can be configured with instructions on how to obtain the configuration values, by increasing order of difficulty. Microsoft Bing Places Search seems like the best option because it's easy to setup and the search result quality is pretty good.
Bing Places Search API (very easy)Notes:
- You will need to use or create a free microsoft account to retrieve the configuration values
- There is no need for a credit card
- The free quota is plenty for a single user
- The configuration value you will need to obtain is a Bing Places API Key
Steps:
- Follow the instructions here: https://docs.microsoft.com/en-us/bingmaps/getting-started/bing-maps-dev-center-help/getting-a-bing-maps-key
- Use the following key type: "Bing Maps Keys for Business and Personal Use"
- Use the following application type: "Website"
- You can then create/retrieve the key from here: https://www.bingmapsportal.com/Application under "My Account" > "My Keys"
Notes:
- You will need to use or create a free HERE account to retrieve the configuration values
- There is no need for a credit card
- The free quota is plenty for a single user
- The configuration values you will need to obtain are App ID and App Code
Steps:
- Create an account here: https://developer.here.com/authenticationpage
- Open the projects page here: https://developer.here.com/projects
- Click "Select a plan for a new project"
- Select the "Fremium" plan and create your new project
- Go back to the projects page here: https://developer.here.com/projects
- Click on your project
- Under "JS REST" / "REST & XYZ HUB API/CLI" click on "Generate App ID and App Code"
- Under "JS REST" / "REST & XYZ HUB API/CLI" find your App ID under "APP ID" and your App Code under "APP CODE"
- Save the App ID and the App Code in a way that you can paste them into Map Marker
Notes:
- !!!FOR ADVANCED USERS ONLY!!!
- You will need to use or create a free Google account to retrieve the configuration values
- The free quota should be enough for a single user
- The configuration value you will need to obtain is the API key
- To get a functional API key, you will need to give your credit card information to Google
- Google may charge you on the API usage
- There are ways to limit the usage to only the free quota, to avoid being charged, but they depend on your configuration
- It is impossible to use the free quota without providing a credit card
- It is impossible to guarantee no expenses due to an accidental bad configuration
- I will not provide support for this, you will have to interact with Google directly: https://developers.google.com/places/web-service/support
Steps:
- Get an API key here: https://developers.google.com/places/web-service/get-api-key
- Enable billing for your google cloud console account
- Set a limit on your Places API usage
- Save the API key in a way that you can paste it into Map Marker
How to use offline maps?
- Download map files manually from here: https://ftp-stud.hs-esslingen.de/pub/Mirrors/download.mapsforge.org/maps/v5/
- Once you have downloaded the map files, put them in a specific folder
- Open Map Marker
- Open the side drawer
- Click settings
- Scroll down to the "Offline maps" section
- Click "Storage folder"
- Select the folder where the offline map files are
- Go back to the main view and open the side drawer
- Click "Map type"
- Select "Offline (Mapsforge BETA)"
How can I import my starred locations from Google Maps (locations marked with a star on Google Maps)?
- Open the Google Takout page here: https://takeout.google.com/settings/takeout
- Click "Select None" to uncheck everything
- Scroll down and toggle "Maps (your places)"
- Scroll to the bottom
- Click "Next"
- Select a convenient way for you get the files and click "Create archive"
- Click "Download" to download the created archive
- Unzip the archive file and retrieve the file named "Saved Places.json"
- Convert the file to KMZ with this page: https://mygeodata.cloud/converter/
- Import the resulting KMZ file into Map Marker
Important note: This only works for starred locations, not other lists. Unfortunately, at the moment, it seems Google does not provide a way to export those.
How can I extract POI images from Map Marker?
If you want to extract POI images from Map Marker, there are several ways you can go about this.
Image extraction - Method 1: the KMZ export
- Find out how to change a file extension on your system (Linux / Windows / MacOS / etc.): if you don't know how to do this, search for "How to change a file extention in Linux/Windows/MacOS/WhatEverYourSystemIs" in your favorite search engine
- Export your map as a KMZ file
- Change the KMZ file extension from .kmz to .zip
- Extract the zip file with a zip files manager
- Image files will be in the extracted "local_media" and "cloud_media" folders, without extensions
- Depending on your system, for the system to detect and open these files as images, you might have to change the extension of image files as well to ".png" or ".jpg"
- Sync your map file to the cloud with the premium cloud sync
- Open the map file menu by clicking at the top of the left drawer menu
- Click "Share cloud map" to open the Google Drive folder of the cloud map
- Filter the view to only see image files, they should all be there
When viewing an image from the app, you can share it externally by clicking the "share" button at the top right. However you can only extract images one by one that way.
- Open the image from within the app
- Click the share button at the top right
You can extract all the app files (including images) from the troubleshooting menu.
- Open the left menu in Map Marker
- Click about
- Click troubleshooting
- Extract app files to SD
- Your images should be in the exported folder
Amazon Web Service S3 setup
Using the AWS S3 cloud sync requires you to create an S3 bucket, an access policy defining access to it, and an S3 user's access key to access the bucket with that policy.
The full configuation steps are outlined here:
- If you don't have one already, create an AWS account: https://aws.amazon.com/console/
- Create the S3 bucket by following the instructions here: https://docs.aws.amazon.com/AmazonS3/latest/gsg/CreatingABucket.html
- Unless you have a special use case and you know what you're doing, ensure you followed the instructions to block all public access during the bucket setup
- Create an IAM policy to define access to your S3 bucket:
- Open the IAM policies page: https://console.aws.amazon.com/iam/home#/policies
- Click "Create policy" at the top, this will open the policy creation page
- Switch to the JSON tab
- Paste the following JSON text after replacing "MY_S3_BUCKET_NAME" with your bucket name:
- Click "Review policy" at the bottom
- Enter the policy name at the top (e.g. "map_marker_sync_policy")
- Click "Create policy" at the bottom
- Create a bucket user with their access key:
- Open the IAM users page: https://console.aws.amazon.com/iam/home?#/users
- Click "Add User"
- Enter the user name you want: this is only used for later reference, so pick something that makes sense to you
- Under "Access type", tick the "Programatic access" checkbox
- Click "Next: Permissions"
- On the permissions page, select "Attach existing policies directly"
- Search for the policy you created (e.g. "map_marker_sync_policy") and check its checkbox
- Click "Next: Tags"
- Click "Next: Review"
- Click "Create user"
- You will land on the confirmation page where the Access key ID and the Secret access key will be available
- Copy and save the information somewhere safe
- Click "Close"
- All set! To use the AWS S3 cloud sync in Map Marker, you will need to enter:
- The S3 bucket name
- The access key ID
- The access key secret
IMPORTANT NOTES:
- The Map Marker cloud sync for AWS will not detect concurrent devices writing sync data simultaneously. You should only sync-write one device at a time: if two devices sync-write at the same time, there is a chance that the changes coming from one of the two devices will be ignored and lost. This is due to the way AWS S3 is built as a distributed system, and only applies to devices writing data. Read-only sync doesn't have a limit on number of devices at the same time.
- You can create a read-only policy with an associated read-only user by following these steps and removing the line containing "s3:PutObject" in the JSON sample. This is great if you want to grant read-only access to some people and read-write access to other people.
FAQ
What is the premium upgrade?
The Map Marker lifetime premium upgrade for the Android app grants you lifetime access to the Map Marker premium on an unlimited number of Android devices.
The premium grants you access to:
- Cloud sync with Google Drive or Dropbox
- Cloud map collaboration with other premium users
- Map versions history with restore ability
I want to try early features, how can I use the beta?
If you're impatient to test new upcoming features and you are not afraid to encounter bugs in the app, you can join the beta.
Note that it is HIGHLY RECOMMENDED that you know how to save/restore your markers via the manual export/import or the cloud sync BEFORE joining the beta.
Also note that if I'm not working on any special feature, the beta might not have anything different from the production app.
With all that being noted, you can join the beta here:
https://play.google.com/apps/testing/com.exlyo.mapmarker
How can I help with translations?
Follow the instructions on the github page for translations: https://github.com/androidseb/mapmarkerapptranslations
I have a feature idea, how should I submit the idea?
First you should take a look at the Map Marker roadmap to see if the idea is not already there:
https://mapmarker.app/wip.html
Then if the idea is not already submitted, you can send me an email and I’ll check it out :-)
How can I stay tuned about what’s coming soon for Map Marker?
If you want to know what’s coming next you can check this page:
https://mapmarker.app/wip.html
If you want to be notified when new features come out, follow me on twitter:
https://twitter.com/mapmarkerapp
Why is Map Marker not a navigation app?
Navigation apps are complex and hard to get right, and there are already a lot of good navigation apps out there. I believe that as a single developer, the way I can provide most value with Map Marker is by focusing on the ability to organize your places, and have an easy way to start navigation into navigation-focused apps. Map Marker’s focus is different from navigation.
How do I add locations on Google Maps?
Map Marker does not provide such features. Instead, try using one of those links:
- https://www.google.ca/mybusiness
- https://play.google.com/store/apps/details?id=com.google.android.apps.vega
A place in Google Maps has wrong/inaccurate data, how do I fix it?
Map Marker does not interact with Google Maps data, instead, try using the Google platform:
- go on Google Maps from a desktop computer:
- click the location that needs fixing
- click "suggest an edit"
Troubleshooting and known problems
Cloud sync error: 404 file not found
When performing cloud sync, this error can occur if some remote cloud files have been deleted.
This can happen if you (or one of your collaborators if you're sharing access) have deleted the cloud files from your cloud storage account.
When this error happens, you can no longer sync to the cloud map and it also probably means that the only copy of your data is on your device, since the cloud data is gone.
The recommended way to proceed in case you encounter this error is the following:
- Export your markers as a KMZ file
- To minimize the risks of losing the data, create a copy of that exported file somewhere like a secondary device, or a cloud storage account
- By default, Map Marker creates a dedicated folder in your cloud storage account called "Map Marker Places Organizer": identify the source of the cloud data deletion so that it doesn't happen again, for example, if one of your collaborators deleted some file accidentally (e.g. "accidental cleanup"), explain them why not deleting these files is important
- Create a new cloud map
- Import the data from the KMZ file
- Sync your cloud map
GPS location inaccurate
On some Android devices, it can happen that the GPS location becomes inaccurate over time. In some cases,
it's even possible to see a correct accurate location in one app and a completely inaccurate location in another app.
This is due to the way location tracking works at the system level and can sometimes be resolved by restarting your device.
Note that only restarting your device can be insufficient, as some components like the GPS chip might not have been fully powered off in the process.
The following steps can often work to resolve the issue:
- Power off your device completely
- Wait for 10 seconds
- Power your device back on
Problems with Google My Maps
Google My Maps cannot import the KML/KMZ files produced by Map Marker if they contain the default folder, because it cannot handle an empty folder name. To work around this, you will need to import only one folder at a time, that is not the default folder.
Premium troubleshooting
When you purchase the premium, it becomes available for life for your Google account. The Google account granted with the premium access is the one used to perform the purchase. Upon purchasing the premium, you will receive a confirmation email with an order number. From then on, you can use the premium on as many devices as you want. However you will need to use the exact same Google account to perform the installation of Map Marker on your other device.
If you cannot use the premium:
- Backup your markers outside of the app
- Un-install the app
- Open the Google play app
- Make sure you are signed in with your Google account owning the premium in the left drawer of the Google Play app
- Download and install Map Marker again
If these steps don't work you can send me your order number for confirmation and I will help you.
Problems with corrupted files on app launch (code 14 SQLITE_CANTOPEN)
This problem typically indicates a problem with the system data restoring from Google Drive on app install. After installing the app, the app data has been restored in a corrupted state causing this issue.
If you encounter this problem:
- IMPORTANT: make sure you have backed up your data because this involves deleting the app data from the device
- Open the system settings
- Applications
- Map Marker
- Storage
- CLEAR STORAGE
Problems with Google Play Services
Some problems with the Google Play Services app can cause various issues with Google-related services.
Sometimes, you can fix this by clearing the Google Play Services app data:
- Open the system settings
- Applications
- Google Play Services
- Storage
- CLEAR STORAGE
- CLEAR ALL DATA
Problems with map display: blank map
Some problems with the Google Maps component can prevent the map display from loading properly, resulting in an empty blank map.
Sometimes you can fix this by clearing the Google Play Services app data.
Unfortunaltey sometimes this will not be enough and you will need to clear the app data completely to resolve the issue.
Since clearing the app data will result in all your markers being deleted, you have to carefully follow these steps to avoid losing your data:
- Export your markers as a KMZ file
- Copy the KMZ file to an other device
- Confirm you can import back your markers from the KMZ file
- Keep the KMZ file in a safe location
- ONLY after your markers data is secured, proceed with next steps
- Turn on the problematic device
- Open the system settings
- Applications
- Map Marker
- Storage
- CLEAR STORAGE
- CLEAR ALL DATA
- Restart the app
- Import your markers back from the KMZ file
Problems with blocked internet access
In some cases, even though your device has correct internet access, the system can block internet access to Map Marker, preventing the app from accessing internet, and preventing sync and causing the map not to load. This can be caused by battery savers and/or incorrect system parameters. If that happens, you can try the following steps to troubleshoot:
- Check for any power-saving / network blocking apps and ensure that Map Marker is allowed to use the network
- If that doesn't work, reset your network settings:
- Open the system settings
- Navigate to network settings
- Select "Reset network settings"
- Restart your device
- If that doesn't work, back-up your data and re-install the app:
- Export your markers
- Import your markers back to another device to confirm that the backup worked
- Once you're confident your data is safely backed-up, uninstall the app
- Restart your device
- Install the app again
Collecting log files when encountering errors
If you're encountering an error and there is a need for more detailed error information, you can collect log files for your error the following way:
- In the app side drawer click "About"
- Click "Troubleshooting"
- Click "Enable error file dump"
- Reproduce the error
- Go in your SD card under the MapMarker/error_log_files
- Send all the error log files to help debug the issue
Main map interface
Main menu interface
Marker info window
Using markers, lines and polygons
Creating markers
Creating lines
Creating polygons
Editing markers, lines and polygons
Deleting markers, lines and polygons
Using the organizer
Using map folders
Create a folder
Edit a folder
Marker templates: custom fields
Presets, templates and bulk icons with folders
Cloud and collaborating
How to sync a local map folder on the cloud
How to create a new map folder on the cloud
How to share your map cloud folder with other people on the cloud
How to open an existing map file from the cloud?
How to restore a previous version from history?
Importing and exporting markers
How to export/share your markers?
How to import your markers from a KML, KMZ or CSV file?
Migrating your data to a new device
Advanced features
Configuring third party search sources
How can I import my starred locations from Google Maps (locations marked with a star on Google Maps)?
How can I extract POI images from Map Marker?
FAQ
What is the premium upgrade?
I want to try early features, how can I use the beta?
How can I help with translations?
I have a feature idea, how should I submit the idea?
How can I stay tuned about what’s coming soon for Map Marker?
Why is Map Marker not a navigation app?
How do I add locations on Google Maps?
A place in Google Maps has wrong/inaccurate data, how do I fix it?
What should I know about the premium upgrade?
Troubleshooting and known problems
Cloud sync error: 404 file not found
User interface description
Main map interface
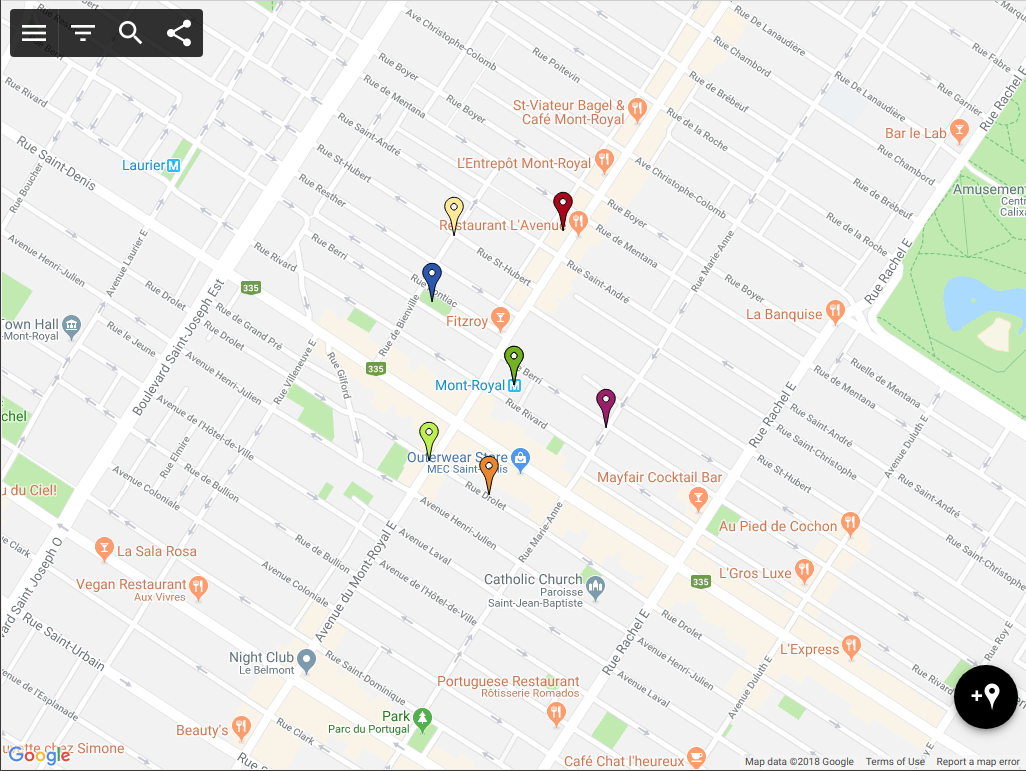
In the screenshot below, from left to right and from top to bottom, we have:
- The action bar (top left)
- menu button
- jump button
- search button
- share button
- The “my location” button (top right)
- The add button (bottom right)
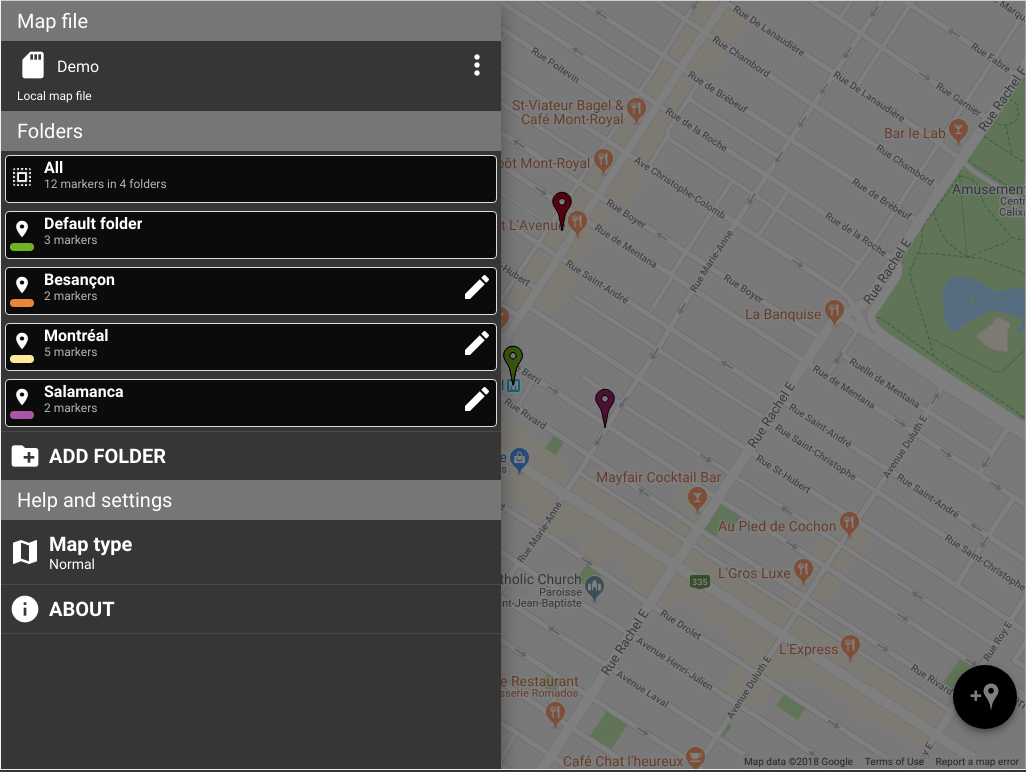
Main menu interface
Clicking the menu button will open the main menu. The main menu has the following elements (from top to bottom):
- Map file header
- Folders
- Add folder button
- Map type button
- Settings button
- About button
- Premium-related elements

Marker info window
When you select a marker (when clicking on it for example), you will see the marker info window. The info window has 4 buttons:
- Marker edit button (top left)
- Copy to clipboard button (top right)
- Navigation button (bottom left)
- Call button (bottom right)
Using markers, lines and polygons
Creating markers
To create a new marker, click on the add button from the main map interface, then move the map around to place the target where you want to place the marker. When the target is at the desired location, click “OK” to place the marker.
Creating lines
To create a new line, click on the add button from the main map interface and then click the line button on the left. Place new points with the “+” button, move from one point to another with the arrow buttons and click the save button when you’re done.
Creating polygons
To create a new polygon, click on the add button from the main map interface and then click the polygon button on the left. Place new points with the “+” button, move from one point to another with the arrow buttons and click the save button when you’re done.
Editing markers, lines and polygons
To edit a marker, a line or a polygon, start by selecting it (by clicking on it for example) and hit the edit button of the info window showing up. This will open the marker edit page. From there you will be able to edit all the attributes of the marker. Note: if you’re editing a line or polygon, you will have the option to edit the points of the line or polygons from this page by clicking the “edit” button in the “Coordinates” section.
Deleting markers, lines and polygons
To delete one marker:
- select the marker (by clicking it for example)
- click the edit button in the info window, this will open the marker edit page
- scroll down to click on the delete button
- confirm the deletion
To delete multiple markers at once, you can use the organizer (see the "organizer" section from this help page)
Using the organizer
You can open the organizer by clicking the organize button from the top bar of the main page. The organizer will allow you to perform actions on multiple markers at once.
At the top of the screenshot below, we can see from left to right:
- Select all button: select all the markers in the list
- Move to folder button: move the selected markers to another folder
- Copy to folder button: move the selected markers to another folder
- Delete button: delete the selected markers

Using map folders
You can use map folders to organize your markers into different sections. Things you can do with folders:
- create a folder
- edit a folder
- marker templates: custom fields
- mass assign color
- mass assign custom fields
Create a folder
To create a folder:
- open the sidebar
- click "Add folder"
- enter the desired folder information
- click ok to save the new folder
Edit a folder
To edit a folder:
- open the sidebar
- long press on the folder you wish to edit
- modify the folder to your liking
- click ok to save the changes
Marker templates: custom fields
While creating or editing a folder, you can define custom fields into the folder. Those folder custom fields will act as a template: when creating a new marker with only one folder selected, if that folder has custom fields then the folder's custom fields will automatically be added to the newly created marker.
To create a folder's custom fields from the folder create/edit page:
- click "more options"
- select "add custom field"
- edit the custom field to your liking and save it
To edit a folder's custom fields from the folder create/edit page:
- click on the custom field from the custom fields list
- edit the custom field to your liking and save it
Presets, templates and bulk icons with folders
If you want markers to be automatically created with a specific combination of icon, color and custom fields you can achieve this through folders. Folders will act as templates for their children markers. To do this:
- Create a folder
- Choose the icon, color and custom fields that you would like to see by default for new markers
- Save the folder
- Double click on the folder from the main menu to select only that folder
- And any new marker that you create will inherit its parent folder’s attributes
Cloud and collaborating
How to sync a local map folder on the cloud
If your map file is local and has not been synced on the cloud yet, follow those steps:
- Open the left drawer
- Click on the map file to open the file options menu
- Select the "cloud sync" option
- Select your account
- Click ok
How to create a new map folder on the cloud
- Open the left drawer
- Click on the map file to open the file options menu
- Select the "create map file" option
- Select "create cloud map"
- Select your account
- Click ok
How to share your map cloud folder with other people on the cloud
- Open the left drawer
- Click on the map file to open the file options menu
- Select "share cloud map"
- Open with the Google Drive app
- Open the cloud folder details
- Select "add people" and add give "write permissions" to your friends
- Have your friends install Map Marker
- Your friends will then need to open the existing map file from the cloud
How to open an existing map file from the cloud?
- Open the left drawer
- Select the "open map file" option
- Select the "open cloud map" option
- Select the cloud map you want to open
How to restore a previous version from history?
- open the left drawer
- click on the map file to open the file options menu
- select the "view history/restore" option
- select the version to restore from the list
Importing and exporting markers
How to export/share your markers?
- Click the "share" button of the main action bar (last button)
- Select "All markers and folders"
- Select the app to export to (Gmail, Google Drive, Dropbox, etc.)
How to import your markers from a KML, KMZ or CSV file?
- Open the file details
- Find the "open with" option
- You should see a list of apps to open the file with
- In the list of apps, select Map Marker
- Map Marker will start and you will show a confirmation prompt
- Click yes to import the file
Note: the CSV file import will only work if the file has "Latitude" and "Longitude" columns. To see an example of how the file should look like, you can export a CSV file from Map Marker and send it to yourself.
Migrating your data to a new device
If you lost your device or did a factory reset or simply got a new device, you might need to migrate your previous markers data to this new device. Depending on your case, there are several ways to do this...
Case 1: You were using the premium cloud sync on your previous device
⇒ Simply open the existing cloud map by following the instructions in this section: How to open an existing map file from the cloud?
Case 2: You were not using the cloud sync, but you saved your markers into a file with the export feature
⇒ To import your markers into the new device, follow the instructions in this section: Importing and exporting markers
Case 3: You created no backup but you still have access to the previous device's data
⇒ You will need to export the markers data from your previous device, and then import your markers data into your new device. For more information on how to export and import data, see the following section: Importing and exporting markers
Case 4: You created no backup and you do not have access to your previous device's data
⇒ Depending on your iCloud settings, the app data might have been backed up. If that wasn't the case, then there is no other way to retrieve the data to my knowledge :'(
Advanced features
Configuring third party search sources
You can add or configure third party search sources in Map Marker from the "Places search sources" section menu.
Once you have obtained a third party search source configuration, you can re-use this same configuration on any device running Map Marker.
To use a configuration, from the search source menu in Map Marker:
- Click "Add or configure search source"
- Click on the search source that you want to add/configure
- Enter/paste the requested configuration values
- Check the displayed result (success/failure)
Below are the different third party sources that can be configured with instructions on how to obtain the configuration values, by increasing order of difficulty. Microsoft Bing Places Search seems like the best option because it's easy to setup and the search result quality is pretty good.
Bing Places Search API (very easy)Notes:
- You will need to use or create a free microsoft account to retrieve the configuration values
- There is no need for a credit card
- The free quota is plenty for a single user
- The configuration value you will need to obtain is a Bing Places API Key
Steps:
- Follow the instructions here: https://docs.microsoft.com/en-us/bingmaps/getting-started/bing-maps-dev-center-help/getting-a-bing-maps-key
- Use the following key type: "Bing Maps Keys for Business and Personal Use"
- Use the following application type: "Website"
- You can then create/retrieve the key from here: https://www.bingmapsportal.com/Application under "My Account" > "My Keys"
Notes:
- You will need to use or create a free HERE account to retrieve the configuration values
- There is no need for a credit card
- The free quota is plenty for a single user
- The configuration values you will need to obtain are App ID and App Code
Steps:
- Create an account here: https://developer.here.com/authenticationpage
- Open the projects page here: https://developer.here.com/projects
- Click "Select a plan for a new project"
- Select the "Fremium" plan and create your new project
- Go back to the projects page here: https://developer.here.com/projects
- Click on your project
- Under "JS REST" / "REST & XYZ HUB API/CLI" click on "Generate App ID and App Code"
- Under "JS REST" / "REST & XYZ HUB API/CLI" find your App ID under "APP ID" and your App Code under "APP CODE"
- Save the App ID and the App Code in a way that you can paste them into Map Marker
Notes:
- !!!FOR ADVANCED USERS ONLY!!!
- You will need to use or create a free Google account to retrieve the configuration values
- The free quota should be enough for a single user
- The configuration value you will need to obtain is the API key
- To get a functional API key, you will need to give your credit card information to Google
- Google may charge you on the API usage
- There are ways to limit the usage to only the free quota, to avoid being charged, but they depend on your configuration
- It is impossible to use the free quota without providing a credit card
- It is impossible to guarantee no expenses due to an accidental bad configuration
- I will not provide support for this, you will have to interact with Google directly: https://developers.google.com/places/web-service/support
Steps:
- Get an API key here: https://developers.google.com/places/web-service/get-api-key
- Enable billing for your google cloud console account
- Set a limit on your Places API usage
- Save the API key in a way that you can paste it into Map Marker
How can I import my starred locations from Google Maps (locations marked with a star on Google Maps)?
- Open the Google Takout page here: https://takeout.google.com/settings/takeout
- Click "Select None" to uncheck everything
- Scroll down and toggle "Maps (your places)"
- Scroll to the bottom
- Click "Next"
- Select a convenient way for you get the files and click "Create archive"
- Click "Download" to download the created archive
- Unzip the archive file and retrieve the file named "Saved Places.json"
- Convert the file to KMZ with this page: https://mygeodata.cloud/converter/
- Import the resulting KMZ file into Map Marker
Important note: This only works for starred locations, not other lists. Unfortunately, at the moment, it seems Google does not provide a way to export those.
How can I extract POI images from Map Marker?
If you want to extract POI images from Map Marker, there are several ways you can go about this.
Image extraction - Method 1: the KMZ export
- Find out how to change a file extension on your system (Linux / Windows / MacOS / etc.): if you don't know how to do this, search for "How to change a file extention in Linux/Windows/MacOS/WhatEverYourSystemIs" in your favorite search engine
- Export your map as a KMZ file
- Change the KMZ file extension from .kmz to .zip
- Extract the zip file with a zip files manager
- Image files will be in the extracted "local_media" and "cloud_media" folders, without extensions
- Depending on your system, for the system to detect and open these files as images, you might have to change the extension of image files as well to ".png" or ".jpg"
- Sync your map file to the cloud with the premium cloud sync
- Open the map file menu by clicking at the top of the left drawer menu
- Click "Share cloud map" to open the Google Drive folder of the cloud map
- Filter the view to only see image files, they should all be there
FAQ
What is the premium upgrade?
The Map Marker lifetime premium upgrade for the iOS app grants you lifetime access to the Map Marker premium on an unlimited number of iOS devices.
The premium grants you access to:
- Cloud sync with Google Drive or Dropbox
- Cloud map collaboration with other premium users
- Map versions history with restore ability
I want to try early features, how can I use the beta?
If you're impatient to test new upcoming features and you are not afraid to encounter bugs in the app, you can join the beta.
Note that it is HIGHLY RECOMMENDED that you know how to save/restore your markers via the manual export/import or the cloud sync BEFORE joining the beta.
Also note that if I'm not working on any special feature, the beta might not have anything different from the production app.
With all that being noted, you can join the beta here:
https://testflight.apple.com/join/nQWmtq8I
How can I help with translations?
Follow the instructions on the github page for translations: https://github.com/androidseb/mapmarkerapptranslations
I have a feature idea, how should I submit the idea?
First you should take a look at the Map Marker roadmap to see if the idea is not already there:
https://mapmarker.app/wip.html
Then if the idea is not already submitted, you can send me an email and I’ll check it out :-)
How can I stay tuned about what’s coming soon for Map Marker?
If you want to know what’s coming next you can check this page:
https://mapmarker.app/wip.html
If you want to be notified when new features come out, follow me on twitter:
https://twitter.com/mapmarkerapp
Why is Map Marker not a navigation app?
Navigation apps are complex and hard to get right, and there are already a lot of good navigation apps out there. I believe that as a single developer, the way I can provide most value with Map Marker is by focusing on the ability to organize your places, and have an easy way to start navigation into navigation-focused apps. Map Marker’s focus is different from navigation.
How do I add locations on Google Maps?
Map Marker does not provide such features. Instead, try using one of those links:
- https://www.google.ca/mybusiness
- https://play.google.com/store/apps/details?id=com.google.android.apps.vega
A place in Google Maps has wrong/inaccurate data, how do I fix it?
Map Marker does not interact with Google Maps data, instead, try using the Google platform:
- go on Google Maps from a desktop computer:
- click the location that needs fixing
- click "suggest an edit"
What should I know about the premium upgrade?
When you purchase the premium, it becomes available for life for your Apple account.
The Apple account granted with the premium access is the one used to perform the purchase.
Upon purchasing the premium, you will receive a confirmation email with an order number.
From then on, you can use the premium on as many iOS devices as you want.
However you will need to use the exact same Apple account to perform the installation of
Map Marker on your other device.
To restore the premium on a newly installed iOS device:
- Open the side drawer by clicking the top left button on the main action bar
- Click premium
- Click "restore purchases"
If these steps don't work you can send me your order number for confirmation and I will help you.
Troubleshooting and known problems
Cloud sync error: 404 file not found
When performing cloud sync, this error can occur if some remote cloud files have been deleted.
This can happen if you (or one of your collaborators if you're sharing access) have deleted the cloud files from your cloud storage account.
When this error happens, you can no longer sync to the cloud map and it also probably means that the only copy of your data is on your device, since the cloud data is gone.
The recommended way to proceed in case you encounter this error is the following:
- Export your markers as a KMZ file
- To minimize the risks of losing the data, create a copy of that exported file somewhere like a secondary device, or a cloud storage account
- By default, Map Marker creates a dedicated folder in your cloud storage account called "Map Marker Places Organizer": identify the source of the cloud data deletion so that it doesn't happen again, for example, if one of your collaborators deleted some file accidentally (e.g. "accidental cleanup"), explain them why not deleting these files is important
- Create a new cloud map
- Import the data from the KMZ file
- Sync your cloud map
How to open the Web App
Main map interface
Main menu interface
Marker info window
Using markers, lines and polygons
Creating markers
Creating lines
Creating polygons
Editing markers, lines and polygons
Deleting markers, lines and polygons
Using the organizer
Using map folders
Create a folder
Edit a folder
Marker templates: custom fields
Presets, templates and bulk icons with folders
Cloud and collaborating
How to sync a local map folder on the cloud
How to create a new map folder on the cloud
How to share your map cloud folder with other people on the cloud
How to open an existing map file from the cloud?
How to restore a previous version from history?
Importing and exporting markers
How to export/share your markers?
How to import your markers from a KML, KMZ or CSV file?
Migrating your data to a new device
Advanced features
Configuring third party search sources
How can I import my starred locations from Google Maps (locations marked with a star on Google Maps)?
How can I extract POI images from Map Marker?
FAQ
I want to try early features, how can I use the beta?
How can I help with translations?
I have a feature idea, how should I submit the idea?
How can I stay tuned about what’s coming soon for Map Marker?
Why is Map Marker not a navigation app?
How do I add locations on Google Maps?
A place in Google Maps has wrong/inaccurate data, how do I fix it?
Troubleshooting and known problems
Cloud sync error: 404 file not found
QuotaExceededError
Various browser issues
Images not displaying (white squares instead)
User interface description
How to open the Web App
The web app is meant to be opened from your computer's web browser. You can reach the web app from the home page by clicking "Launch the Web App" or by clicking here
Main map interface
In the screenshot below, from left to right and from top to bottom, we have:
- The action bar (top left)
- menu button
- jump button
- search button
- share button
- The add button (bottom right)
Main menu interface
Clicking the menu button will open the main menu. The main menu has the following elements (from top to bottom):
- Map file header
- Folders
- Add folder button
- Map type button
- Settings button
- About button
- Premium-related elements
Marker info window
When you select a marker (when clicking on it for example), you will see the marker info window. The info window has 4 buttons:
- Marker edit button (top left)
- Copy to clipboard button (top right)
- Navigation button (bottom left)
- Call button (bottom right)
Using markers, lines and polygons
Creating markers
To create a new marker, click on the add button from the main map interface, then move the map around to place the target where you want to place the marker. When the target is at the desired location, click “OK” to place the marker.
Creating lines
To create a new line, click on the add button from the main map interface and then click the line button on the left. Place new points with the “+” button, move from one point to another with the arrow buttons and click the save button when you’re done.
Creating polygons
To create a new polygon, click on the add button from the main map interface and then click the polygon button on the left. Place new points with the “+” button, move from one point to another with the arrow buttons and click the save button when you’re done.
Editing markers, lines and polygons
To edit a marker, a line or a polygon, start by selecting it (by clicking on it for example) and hit the edit button of the info window showing up. This will open the marker edit page. From there you will be able to edit all the attributes of the marker. Note: if you’re editing a line or polygon, you will have the option to edit the points of the line or polygons from this page by clicking the “edit” button in the “Coordinates” section.
Deleting markers, lines and polygons
To delete one marker:
- select the marker (by clicking it for example)
- click the edit button in the info window, this will open the marker edit page
- scroll down to click on the delete button
- confirm the deletion
To delete multiple markers at once, you can use the organizer (see the "organizer" section from this help page)
Using the organizer
You can open the organizer by clicking the organize button from the top bar of the main page. The organizer will allow you to perform actions on multiple markers at once.
At the top of the screenshot below, we can see from left to right:
- Select all button: select all the markers in the list
- Move to folder button: move the selected markers to another folder
- Copy to folder button: move the selected markers to another folder
- Delete button: delete the selected markers
Using map folders
You can use map folders to organize your markers into different sections. Things you can do with folders:
- create a folder
- edit a folder
- marker templates: custom fields
- mass assign color
- mass assign custom fields
Create a folder
To create a folder:
- open the sidebar
- click "Add folder"
- enter the desired folder information
- click ok to save the new folder
Edit a folder
To edit a folder:
- open the sidebar
- long press on the folder you wish to edit
- modify the folder to your liking
- click ok to save the changes
Marker templates: custom fields
While creating or editing a folder, you can define custom fields into the folder. Those folder custom fields will act as a template: when creating a new marker with only one folder selected, if that folder has custom fields then the folder's custom fields will automatically be added to the newly created marker.
To create a folder's custom fields from the folder create/edit page:
- click "more options"
- select "add custom field"
- edit the custom field to your liking and save it
To edit a folder's custom fields from the folder create/edit page:
- click on the custom field from the custom fields list
- edit the custom field to your liking and save it
Presets, templates and bulk icons with folders
If you want markers to be automatically created with a specific combination of icon, color and custom fields you can achieve this through folders. Folders will act as templates for their children markers. To do this:
- Create a folder
- Choose the icon, color and custom fields that you would like to see by default for new markers
- Save the folder
- Double click on the folder from the main menu to select only that folder
- And any new marker that you create will inherit its parent folder’s attributes
Cloud and collaborating
How to sync a local map folder on the cloud
If your map file is local and has not been synced on the cloud yet, follow those steps:
- Open the left drawer
- Click on the map file to open the file options menu
- Select the "cloud sync" option
- Select your account
- Click ok
How to create a new map folder on the cloud
- Open the left drawer
- Click on the map file to open the file options menu
- Select the "create map file" option
- Select "create cloud map"
- Select your account
- Click ok
How to share your map cloud folder with other people on the cloud
- Open the left drawer
- Click on the map file to open the file options menu
- Select "share cloud map"
- Open with the Google Drive app
- Open the cloud folder details
- Select "add people" and add give "write permissions" to your friends
- Have your friends install Map Marker
- Your friends will then need to open the existing map file from the cloud
How to open an existing map file from the cloud?
- Open the left drawer
- Select the "open map file" option
- Select the "open cloud map" option
- Select the cloud map you want to open
How to restore a previous version from history?
- open the left drawer
- click on the map file to open the file options menu
- select the "view history/restore" option
- select the version to restore from the list
Importing and exporting markers
How to export/share your markers?
- Click the "share" button of the main action bar (last button)
- Select "All markers and folders"
- The exported file should download from your browser
How to import your markers from a KML, KMZ or CSV file?
- Open the left drawer
- Click on the map file to open the file options menu
- Select the "import markers" option
- Select the file from your computer and the import will start
Note: the CSV file import will only work if the file has "Latitude" and "Longitude" columns. To see an example of how the file should look like, you can export a CSV file from Map Marker and send it to yourself.
Migrating your data to a new device
If you lost your device or did a factory reset or simply got a new device, you might need to migrate your previous markers data to this new device. Depending on your case, there are several ways to do this...
Case 1: You were using the premium cloud sync on your previous device
⇒ Simply open the existing cloud map by following the instructions in this section: How to open an existing map file from the cloud?
Case 2: You were not using the cloud sync, but you saved your markers into a file with the export feature
⇒ To import your markers into the new device, follow the instructions in this section: Importing and exporting markers
Case 3: You created no backup but you still have access to the previous device's data
⇒ You will need to export the markers data from your previous device, and then import your markers data into your new device. For more information on how to export and import data, see the following section: Importing and exporting markers
Case 4: You created no backup and you do not have access to your previous device's data
⇒ Since the web app is on your browser only, there is no other way to retrieve the data to my knowledge :'(
Advanced features
Configuring third party search sources
You can add or configure third party search sources in Map Marker from the "Places search sources" section menu.
Once you have obtained a third party search source configuration, you can re-use this same configuration on any device running Map Marker.
To use a configuration, from the search source menu in Map Marker:
- Click "Add or configure search source"
- Click on the search source that you want to add/configure
- Enter/paste the requested configuration values
- Check the displayed result (success/failure)
Below are the different third party sources that can be configured with instructions on how to obtain the configuration values, by increasing order of difficulty. Microsoft Bing Places Search seems like the best option because it's easy to setup and the search result quality is pretty good.
Bing Places Search API (very easy)Notes:
- You will need to use or create a free microsoft account to retrieve the configuration values
- There is no need for a credit card
- The free quota is plenty for a single user
- The configuration value you will need to obtain is a Bing Places API Key
Steps:
- Follow the instructions here: https://docs.microsoft.com/en-us/bingmaps/getting-started/bing-maps-dev-center-help/getting-a-bing-maps-key
- Use the following key type: "Bing Maps Keys for Business and Personal Use"
- Use the following application type: "Website"
- You can then create/retrieve the key from here: https://www.bingmapsportal.com/Application under "My Account" > "My Keys"
Notes:
- You will need to use or create a free HERE account to retrieve the configuration values
- There is no need for a credit card
- The free quota is plenty for a single user
- The configuration values you will need to obtain are App ID and App Code
Steps:
- Create an account here: https://developer.here.com/authenticationpage
- Open the projects page here: https://developer.here.com/projects
- Click "Select a plan for a new project"
- Select the "Fremium" plan and create your new project
- Go back to the projects page here: https://developer.here.com/projects
- Click on your project
- Under "JS REST" / "REST & XYZ HUB API/CLI" click on "Generate App ID and App Code"
- Under "JS REST" / "REST & XYZ HUB API/CLI" find your App ID under "APP ID" and your App Code under "APP CODE"
- Save the App ID and the App Code in a way that you can paste them into Map Marker
Notes:
- !!!FOR ADVANCED USERS ONLY!!!
- You will need to use or create a free Google account to retrieve the configuration values
- The free quota should be enough for a single user
- The configuration value you will need to obtain is the API key
- To get a functional API key, you will need to give your credit card information to Google
- Google may charge you on the API usage
- There are ways to limit the usage to only the free quota, to avoid being charged, but they depend on your configuration
- It is impossible to use the free quota without providing a credit card
- It is impossible to guarantee no expenses due to an accidental bad configuration
- I will not provide support for this, you will have to interact with Google directly: https://developers.google.com/places/web-service/support
Steps:
- Get an API key here: https://developers.google.com/places/web-service/get-api-key
- Enable billing for your google cloud console account
- Set a limit on your Places API usage
- Save the API key in a way that you can paste it into Map Marker
How can I import my starred locations from Google Maps (locations marked with a star on Google Maps)?
- Open the Google Takout page here: https://takeout.google.com/settings/takeout
- Click "Select None" to uncheck everything
- Scroll down and toggle "Maps (your places)"
- Scroll to the bottom
- Click "Next"
- Select a convenient way for you get the files and click "Create archive"
- Click "Download" to download the created archive
- Unzip the archive file and retrieve the file named "Saved Places.json"
- Convert the file to KMZ with this page: https://mygeodata.cloud/converter/
- Import the resulting KMZ file into Map Marker
Important note: This only works for starred locations, not other lists. Unfortunately, at the moment, it seems Google does not provide a way to export those.
How can I extract POI images from Map Marker?
If you want to extract POI images from Map Marker, there are several ways you can go about this.
Image extraction - Method 1: the KMZ export
- Find out how to change a file extension on your system (Linux / Windows / MacOS / etc.): if you don't know how to do this, search for "How to change a file extention in Linux/Windows/MacOS/WhatEverYourSystemIs" in your favorite search engine
- Export your map as a KMZ file
- Change the KMZ file extension from .kmz to .zip
- Extract the zip file with a zip files manager
- Image files will be in the extracted "local_media" and "cloud_media" folders, without extensions
- Depending on your system, for the system to detect and open these files as images, you might have to change the extension of image files as well to ".png" or ".jpg"
- Sync your map file to the cloud with the premium cloud sync
- Open the map file menu by clicking at the top of the left drawer menu
- Click "Share cloud map" to open the Google Drive folder of the cloud map
- Filter the view to only see image files, they should all be there
FAQ
I want to try early features, how can I use the beta?
If you're impatient to test new upcoming features and you are not afraid to encounter bugs in the app, you can join the beta.
Note that it is HIGHLY RECOMMENDED that you know how to save/restore your markers via the manual export/import or the cloud sync BEFORE joining the beta.
Also note that if I'm not working on any special feature, the beta might not have anything different from the production app.
With all that being noted, you can join the beta here:
https://www.mapmarker.app/webapp_beta/
How can I help with translations?
Follow the instructions on the github page for translations: https://github.com/androidseb/mapmarkerapptranslations
I have a feature idea, how should I submit the idea?
First you should take a look at the Map Marker roadmap to see if the idea is not already there:
https://mapmarker.app/wip.html
Then if the idea is not already submitted, you can send me an email and I’ll check it out :-)
How can I stay tuned about what’s coming soon for Map Marker?
If you want to know what’s coming next you can check this page:
https://mapmarker.app/wip.html
If you want to be notified when new features come out, follow me on twitter:
https://twitter.com/mapmarkerapp
Why is Map Marker not a navigation app?
Navigation apps are complex and hard to get right, and there are already a lot of good navigation apps out there. I believe that as a single developer, the way I can provide most value with Map Marker is by focusing on the ability to organize your places, and have an easy way to start navigation into navigation-focused apps. Map Marker’s focus is different from navigation.
How do I add locations on Google Maps?
Map Marker does not provide such features. Instead, try using one of those links:
- https://www.google.ca/mybusiness
- https://play.google.com/store/apps/details?id=com.google.android.apps.vega
A place in Google Maps has wrong/inaccurate data, how do I fix it?
Map Marker does not interact with Google Maps data, instead, try using the Google platform:
- go on Google Maps from a desktop computer:
- click the location that needs fixing
- click "suggest an edit"
Troubleshooting and known problems
Cloud sync error: 404 file not found
When performing cloud sync, this error can occur if some remote cloud files have been deleted.
This can happen if you (or one of your collaborators if you're sharing access) have deleted the cloud files from your cloud storage account.
When this error happens, you can no longer sync to the cloud map and it also probably means that the only copy of your data is on your device, since the cloud data is gone.
The recommended way to proceed in case you encounter this error is the following:
- Export your markers as a KMZ file
- To minimize the risks of losing the data, create a copy of that exported file somewhere like a secondary device, or a cloud storage account
- By default, Map Marker creates a dedicated folder in your cloud storage account called "Map Marker Places Organizer": identify the source of the cloud data deletion so that it doesn't happen again, for example, if one of your collaborators deleted some file accidentally (e.g. "accidental cleanup"), explain them why not deleting these files is important
- Create a new cloud map
- Import the data from the KMZ file
- Sync your cloud map
QuotaExceededError
You can run into this error with the message "The quota has been excedded." if you have too much data stored in your browser for the Map Marker website. The web browsers limit how much data a given website can store (usually 5MB) and this error happens when attempting to write more data. This usually happens when you have large map files with a lot of markers. The best way to work around this issue at the moment is to make smaller map files with less markers, and delete the map files you're not using from the left menu.
Various browser issues
Right now, the only officially supported browser is Google Chrome. The app is built with best effort support for other browsers as well without any guarantee.
Images not displaying (white squares instead)
This can happen if your browser has a setting of blocking third-party content. Since images are coming from Google Drive (drive.google.com) instead of mapmarker.app, the browser with third party content blocked might block this, resulting in images displayed as white squares. To fix this on Google Chrome, go to the browser settings and change the settings under "Cookies and other site data" to allow third party cookies on mapmarker.app.